在大量資料需要儲存下,可以將 MongoDB做 Sharding 與 Replica Set 設置,增加DB的吞吐量與可用性。
參考 MongoDB的官網,可以很簡單的就架起 Shard Cluster 架構,以下簡單記錄實作過程。
目前使用 v3.4,不採用最新版 4.0 是因為公司環境用 3.4,但看了文件好像差不太多。
Webinar: Everything You Need to Know about Sharding
強烈建議看完這部一小時的影片,整個觀念非常清楚。
資料庫設定必須從最一開始的
「會有多少資料要儲存? 結構大概是如何? 需要保存多久或是有什麼業務需求?寫入會大概是怎樣情況?讀取又會是如何?會需要高吞吐量又或是低延遲嗎?」
這些因子會根本性決定資料庫的設計,包含 是否要 sharding / database、collection、index 如何設計,甚至是主機的規格與地點選擇。
架構圖
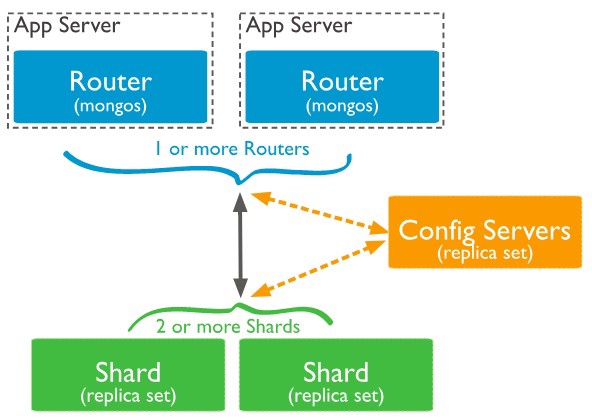 截圖自官網
截圖自官網
主要有三個部分:
- Mongos:對外連接 DB Client 接收對DB的讀寫,接著再根據 Config Server 決定到哪個 Shard 讀寫(會cache住查詢結果)
- Config Server:紀錄 metadata與資料在哪個 shard 上,3.4之後
必須是replica set 架構 - Shard:分片儲存資料處,
建議採用 replica set 架構
最基本要開 1台 Mongos / 3 台 Config Server / 2 組Shard Replica Set 共 11台,分享一下我在 AWS 上開 11台 t2.nano 配 EBS 一天大概兩美金。
以下預設每台機器都安裝好 mongo@3.4
實作
Config server
因為有些設定檔寫成 config file比較方便,以下是我的 mongo.conf
| |
三個參數要注意,其他都是預設值
- sharding:
關於sharding的設定,記得config server 都必須設成clusterRole: configsvr - replication:
每個replica set 都要一組 name分辨 - net:
注意 bindIp 除了 127.0.0.1 外,還要加一個其他機器可以查找的ip,因為replica set 機器間必須要可以溝通,這邊我是用內部IP
另外 127.0.0.1也要保留,有些權限操作必須用 localhost(如關閉Server)
啟動 server 指令是
sudo mongod –config mongo.conf –fork –syslog
加 —-fork是為了跑在背景,三台 config server 都一樣,接著選一台當作 Primary,進入後做 replica set 設定
這部分因為我看一開始的config 不能寫在一起,必須要 mongod啟動後再執行,我是另外寫script,接著直接喂進 mongo shell 執行
replica.js,_id對應是剛才的 replicaSetName,members就是三台 config server,注意要是可以連線的 ip。
| |
指令是
mongo < replica.js
Sharding Cluster
這部分也差不多,只差在 mongo.conf的sharding 參數
sharding:
clusterRole: shardsvr
剩下的 replica set 設定都跟 config server 一樣
Mongos
接下來是Mongos,同樣用mongo.conf 啟動 mongos
| |
執行指令
sudo mongos –config mongos.conf –fork –syslog
接著就是設定 sharding,這邊一樣寫個 js script
sh.addShard( “
…. 有幾個加幾個
這樣就完成了
接著可以登入 mongo shell 檢查
| |
影片建議將 mongos 與 APP Server 放在一起
設定 Sharding
架設好了之後,接著就是要設定 sharding 機制,目前可以針對某個DB的某個Collection 的 Key 做 hash shard / range shard,
range shard 是當 key 在某個範圍內就往哪邊塞;
hash shard 則是會把 key 做 hash 比較容易分散。
// 以下指令在 mongo shell
// 首先啟動sharding
sh.enableSharding("
// 針對某個 collection 設定
sh.shardCollection("
| |
必須注意到如果在sharding 前collection裡面就有值,要先建立 index 才可以設定 shard。
查看狀態可以用 sh.status()
注意事項
有蠻多小細節與限制要注意
Chunk Size:
Chunk 是分片儲存的一個單位,每當有寫入紀錄時會塞到Chunk中,如果超過Chunk Size ,Balancer 平衡器就會把Chunk 拆成兩半分散到不同的Shard去
所以如果 Chunk size 太小會造成過度頻繁的拆分與搬遷,導致性能低落;
如果Chunk size 過大則會造成資料分散不均勻
| |
特別注意,MongoDB初始化的 chunk size 為 1,也就是所有的寫入一開始都會往一個 chunk 塞,導致後續的再平衡很消耗性能,所以建議要調整 numInitialChunks 或是自行初始化 chunk size。
https://docs.mongodb.com/manual/reference/method/sh.shardCollection/
https://docs.mongodb.com/manual/tutorial/create-chunks-in-sharded-cluster/
sharding key:
已知 chunk 超過size 會由 Balancer 負責平衡,如果可以在一開始選好一點的 sharding key 就能避免太多次的拆分與平衡,讓資料均勻的散佈。
選擇 range shard,要避免選擇會遞增的Key,例如預設的_id ,預設_id 是會隨著 timestamp 而遞增,這會導致插入新資料都只會插到同一個 chunk 中,勢必要不斷的拆分!
如果要用 _id,就很適合用 hash shard,因為透過 hash function 遞增的key也比較會被均勻分散;
在配置 hash shard上,如果一開始 collection 是空的,MongoDB可以設定 numInitialChunks要初始化多少個 chunk;
但要記得 key 不能是 float ,因為 hash function 會把 key 先轉乘 64 bit int,所以 2.1 / 2.2 / 2.9 都會被分散到同一個 chunk 上。
參考影片的步驟,
- 如果選則 data center id 不是好的id,因為可能造成資料不平均
- 如果選擇 timestamp 不是好 id ,因為是遞增,所以新增會插到同一個 chunk
- 如果選擇 hash(timestamp) 不是好 id,因為讀取時會需要到多個 shard
- 選擇 device_id 配合 hash shard 是個不錯選擇(假設 device_id 是固定的且每個 device 生成差不多的資料)
- 但如果讀取大多是要讀某個裝置近期某個時間的資料,那改用 (device_id, timestamp) 的組合 key 最理想。
1. Cardinality 高度異質性
2. Write distributed 寫入分布均勻
3. Query isolation 讀取可以集中於同一個 shard
4. reliability 如果某個shard掛了,盡量不要影響到所有的搜尋
5. Index locality 盡量讓讀取可以套用最多的索引
注意:shard key 設定了就不能改變,如果要改就必須重新 sharding,務必謹慎。
指令限制
根據文件 ,針對單一文檔操作如 updateOne / deleteOne必須附帶 shard key;
$group 不能使用,必須改用 mapReduce / aggregate 方法。
每個 shard key 都必須是 index或是 compound index的prefix,同時可以設定為 unique,但必須遵守
1. 如果該文檔已經 sharded,不能把其他欄位設為 unique
2. 如果其他欄位是 unique,則無法對此文檔 shard
總之,要unique 只能是 shard key欄位。
Tag-Aware Shard
除了range shard / hash shard之外,還可以針對個別 shard 做標記,接著就可以透過條件設定讓某些資料固定儲存在該shard上,這樣最大的好處是可以做地理位置優化 ,例如美國用戶就可以讀寫在美國區的 shard上。
1. 先增加Tag
sh.addShardTag(
2. 指定 tag shard 的條件,可以設置多個
| |
接著 mongodb 就會自動平衡
參考資料
非常詳細的簡中文章:http://www.cnblogs.com/zhoujinyi/p/4635444.html
備註
根據官網,最好要有安全設定與角色配置,實作上必須要特別留意。