從應用程式的角度,執行任務可以分成 I/O bound 與 CPU bound,而 I/O 處理相比於 CPU 運算速度慢好幾個層級,所以當 I/O 還沒準備好時會「主動讓」給其他任務,盡可能地讓 CPU 保持忙碌,等到 「I/O 準備好再重新回到 CPU 執行」
在之前理解 Nodejs non-blocking I/O 時,官方文件 Overview of Blocking vs Non-Blocking 寫到
| |
Nodejs sdk 有提供 non-blocking I/O 機制,底層 libuv 會處理 event loop 與其餘 I/O 的執行,「當 I/O 執行時可以讓其他的 JavaScript code 繼續運行不被 block」
所有用「」括起來的地方都是我所想不透的,為什麼 I/O 運行時其他 JavaScript Code 可以繼續運行?是因為 Nodejs 有某種特殊的方法知道目前的程式在等待 I/O 所以主動切換不同的任務執行?如果不是 Nodejs runtime 切換,那會是作業系統切換的嗎?該怎麼切換?
又為什麼 I/O 的處理不需要 CPU 的介入嗎? CPU 怎麼知道 IO 處理完了該繼續往下執行?是不是我的 IO 全部改成 asynchronous 效能就突飛猛進?那為什麼 async io 並不是每個程式語言執行時的預設支援?
同樣最近在看 Golang goroutine Go: Goroutine, OS Thread and CPU Management時又遇到相同的問題,當讀到 goroutine 等待 I/O 回應時 M 會解除 P 並進入等待,讓其他的 M 執行;如果是遇到 network 相關的 I/O 則推至 network poll 等待 network 完成
從應用程式開發者的角度,我們只要知道有神秘的小精靈會幫我們完成 I/O,JavaScript callback / goroutine system call 可以在非同步的狀況下拿到 I/O 回傳的結果就好
但往下思索,這一切的黑幕背後有滿山滿谷的疑惑
作業系統與 I/O 裝置
為了讓開發者可以專注於軟體開發,應用程式多半運行在作業系統之上,透過作業系統提供的統一介面抽象化硬體,並確保單一應用程式不會霸佔硬體資源,所有與 I/O 裝置設備通訊都必須經過作業系統的操控 system call,而這神秘的小精靈就躲在這個環節中
從 high level 的角度來看,大致如下
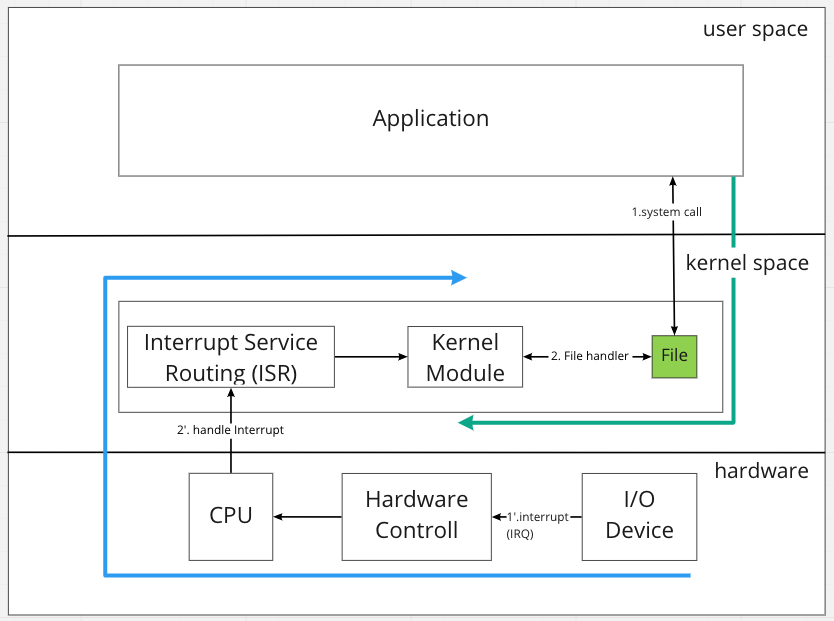 分成兩條路線:應用程式主動呼叫與 I/O 裝置主動觸發
- 應用程式呼叫 system call,此時送出 interrupt 切換到 kernel space 執行
- system call 操作(如讀寫) I/O 裝置對應的 File,觸發 kernel module 運作,這邊專指 device driver 的部分
- 當 I/O 裝置完成特定動作,如網卡接收到封包 / 硬碟讀取完資料,會直接透過
硬體打出 interrupt 訊號給 CPU - CPU 會找到 OS 註冊對應的
interrupt handler 處理,類似於 API server 註冊 api route 等 request 近來就到對應的 handler,mapping 過程稱為ISR - ISR 會找到對應的 device driver 處理
- 補充:這邊我們只探討跟 I/O 相關的議題,所以 interrupt handler 指的是就是以 kernel module 存在的 I/O device driver,其他還有如 timer interrupt handler 等
所以真正有趣的地方在於
I/O device driver 如何在準備資料的時候釋放 CPU 資源,並在資料準備完成後透過 interrupt 重新向 OS 排程並回傳資料
以下將以 Linux 為主,探索作業系統與 I/O 裝置的互動
Linux Kernel module 實作
參考內容 The Linux Kernel Module Programming Guide,現在學習 Linux 真的很幸運有 Jserv 大大的貢獻,用影片與共筆分享在成大教授的課程,並維護這份易讀好懂的 Linux Kernel 開發教學,以下將先以實作切入
kernel space、user space 與 kernel module
先前提到作業系統是為了統一管理硬體而存在,避免應用程式霸佔資源而使其他應用程式無法使用,在執行層面 Linux 拆成 kernel space 與 user space,kernel space 可以操作所以的資源,而一般應用程式執行於 user space 當中,這樣的保護是基於 CPU 所提供,CPU 有不同的模式可以用型,kernel space 有最高權限 (supervisor mode) 而 user space 則是最低權限 (protect mode)
kernel module 是在 Linux runtime 可以動態開關而不需要重新編譯 kernel image 的一段程式,可直接在 kernel space 執行,常見為 I/O device driver
又因為 kernel module 是屬於 kernel 的一部分,所以他們的資源是共享的如記憶體,同樣的如果 kernel module 有問題連帶整個 kernel 都會 crash,以下實驗建議另外開 VM 嘗試,我自己是用 Macbook M1 + Ubuntu 20.20 VM 執行
hello world - kernel module
參考資料 lkmpg - 4.2 Hello and Goodbye
讓我們先從最簡單的 hello world 開始,先了解最基本的 kernel module 安裝、卸載與執行過程
1. hello world
| |
編寫 kernel module 時,有以下三點必備
- 當 module 安裝時要做什麼:init_module
- 當 module 移除時要做什麼:cleanup_module
- 指定 module 的 license:MODULE_LICENSE
需要注意的是,這個 program 在輸出時是用 pr_info 而非 printf,原因是參考 C 編譯過程 在第三階段 Assembly 產出 object code,如果有外部函式庫呼叫會在第四 Linking 階段補上缺少的 object code;
但是 kernel module 的第四階段不同,他只能解析 kernel 所註冊的 symbol,也就是 kernel 本身提供的 system call,可以在 /proc/kallsyms 查看
2. 條列 / 安裝 / 移除 kernel module
編譯用的 MakeFile 參考上附連結,產出 module object code 後,可以透過以下指令操作 kernel module
| |
可以透過 $ sudo journalctl --since "1 hour ago" | grep kernel 查看近一小時 kernel module 打印結果
device driver
所有的裝置在 linux 中都是 file,資料結構可以參考 include/linux/fs.h,首先要先釐清這邊的 File 只存在於 kernel,雖然中文可能都被翻成文件或檔案,但實際上與檔案系統中的檔案概念是不同的! 後者通常是叫做 inode
所以每一個裝置在 linux 中都是以一個 file 存在,通常儲存於 /dev/ 底下,而 device driver 則是 user space 應用程式與 device 溝通的管道,流程大致是
- driver 向 kernel 註冊取得屬於自己的裝置編號與指定檔案
- driver 定義檔案操作
1. 註冊裝置
參考資料 lkmpg - 5.6 Device Drivers 先觀察系統中既有的裝置
| |
可以看到類似的輸出
| |
注意到 “3, 1” 這類型的字串,前面是 major number 後面是 minor number,分別代表 指定 driver, 裝置 id,每個 device driver 都會被分配一個 id,而可能有多個裝置都是由同一個 driver 所驅動,所以有第二個 minor id 讓 driver 區分不同的硬體
接著注意到最前的字元,可能會看到 d / b / c 三種,d 代表 directory 目錄,b 代表 block、c 代表 char;
block device 是指說操作會以 block 為單位,所以有時操作會被 buffer 後才執行,例如硬碟儲存裝置,可以最佳化讀寫的效率;
char device 則沒有 buffer,可以任意讀寫不同的大小,幾乎大多數的裝置都是 char device
2. 註冊檔案操作
當我們想指定 device driver 如何操作檔案時,會定義 file_operations,指定當檔案被讀取 / 寫入時要對應觸發的 handler function,可以看到以下 struct 中幾乎都是定義 function pointer
| |
補充 file 相關資料 Linux 系統程式設計 - fd 及 open()、close() 系統呼叫,file 在 Linux 中必須先被 open() 才能執行後續的讀寫操作,open() 時會把檔案稱作 open file,此時會回傳 file descriptor,資料結構就是上面的 file_operations 紀錄每種動作對應的處理方法
3. 範例程式碼
| |
結論關鍵的程式碼
- 透過 register_chrdev 註冊裝置與指定的 file,系統會返回 major number
- 註冊 file_operators,可以挑選需要的 handler 註冊
- 可以注意一下 device_read 註解,裡面有個 system call
put_user,因為 driver 是在 kernel mode,而 read 是從 user space 觸發,當今天 driver 想要回傳資料給 user space,不能直接寫入記憶體,而是需要透過 put_user 將記憶體從 kernel space 複製到 user space
執行上的細節就不贅述,有興趣可以看參考資料
IO blocking / non-blocking
參考資料 lkmpg - 11 Blocking Processes and threads
當應用程式決定操作 I/O 時,device driver 可能面臨資料尚未準備好的情況,此時會透過 O_NONBLOCK flag 決定是否為 block 應用程式,如果 non-blocking 則直接回傳錯誤 -O_NONBLOCK 讓應用程式晚點重試 (polling),這也就是 Nodejs 所透過的方式,non-blocking I/O (這句話不全然對,還是要看 libuv 針對不同 I/O 的實作,但 non-blocking 就是指這種情況沒錯)
或是應用程式選擇 block mode,此時 device driver 還在等待資料的同時,可以選擇透過 wait_event_interruptible 主動交出 CPU 控制權,避免無謂的佔用 CPU 資源;
同時在 wait 之前會先註冊對應的 wake_up 事件,或是收到 signal 會再叫醒原本沈睡的 process
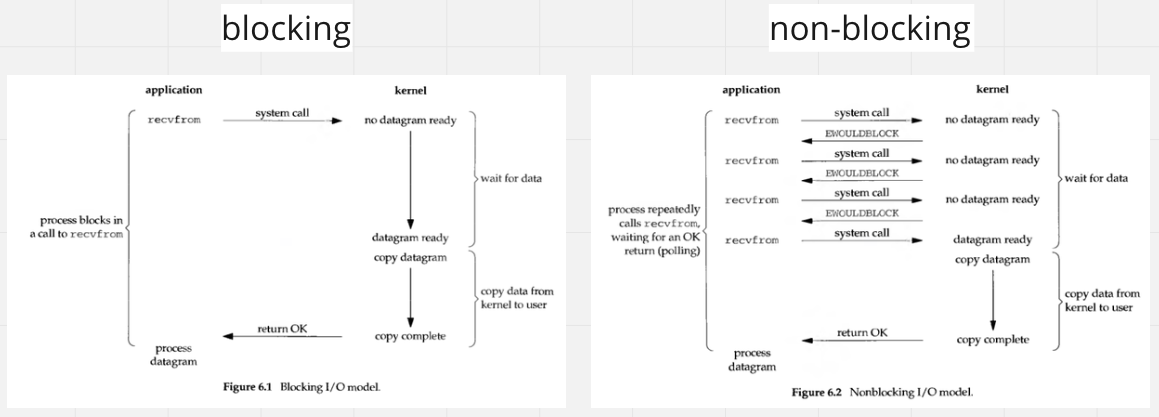
*圖片參考資料 https://medium.com/@clu1022/%E6%B7%BA%E8%AB%87i-o-model-32da09c619e6
重新回來看 blocking 與 non-blocking 的圖,這邊是從應用程式角度出發,blocking I/O 會在 kernel device driver 沒有資料時等待,但從 kernel 角度,如果有指定 interruptable 則作業系統會切換到不同的 process 去,所以也不會有資源浪費的問題 (撇除 context switching 開銷)
system call
前面實作了簡單的 kernel module,並看到 device driver 可以在 file 發生變化時產生對應的行為,但一般來說應用程式與 kernel 的互動是透過封裝過後的 system call
Linux kernel 會有一張 table sys_call_table 儲存支援的 system call 與對應的 address, 當應用程式需要操作硬體需要指定 system call,例如 open() 開啟檔案 / read() 讀取檔案等,在暫存器寫入指定資料後透過特殊指令 interrupt 通知 CPU 要切換 kernel space 執行 (在 intel 中是 0x80),進階資料可以參考 CPU protection ring
1. 從 printf 觀察 system call
參考 lkmpg 5.2 Functions available to modules 透過最簡單的 c program printf 來看 system call 的執行
| |
打包後透過 strace 查看 system call 狀況
| |
打印出蠻多東西,包含一些 memory allocate 的指令等,最終可以看到 write 的 system call 呼叫
| |
2. 修改 system call
如果我們希望修改 system call,理論上可以直接改 sys_call_table 的 mapping,但基於安全性考量這是無法直接在 runtime 操作的,原因是避免 hacker 直接修改 system call
第二個嘗試可以透過 $sudo grep sys_call_table /proc/kallsyms 找出 sys_call_table 所儲存的實際記憶體位置並替換,但這目前也不行,同樣是因為安全性考量, Linux kernel 在每次 boot 時會動態擾亂 kernel code 跟 data (稱為 KASLR),增加 hacker 嘗試攻擊的難度
一個可行的做法是透過 kprobe,這是一個 kernel debug 的工具,當 CPU 執行到中斷點時會保存暫存器狀態,並執行 kprobe 指定的指令,可以透過這種方式去動態調整 system call 執行
但上面的方法在 production 很危險,試想如果有多個 kernel module 去調整 system call,在 restore 時可能會發生意外,不論是復原錯誤或是執行到已經移除的 kernel module,所以建議是直接重新編譯 kernel
CPU 與 Hardware interrupt
上面大致描述綠線的走向,從 user space 呼叫 system call,觸發對應 device driver 所指定的 file operation
接下來看藍線的部分,當 I/O device 收到外部訊號如網卡收到封包、鍵盤被按下按鈕,如何送出中斷給 CPU 並進入後續的處理
具體內容請參考宅色夫的 Linux 核心設計: 中斷處理和現代架構考量,這邊僅大致提一下流程
- I/O 裝置送出 Interrupt Request (IRQ)
- Hardware controller 整理後送出 interrupt vector 到 CPU
- CPU 切換模式立即處理 interrupt,透過 ISR 找到對應的 Interrupt Handler
- Interrupt handler 中有分成 top half / bottom half,top half 是不會被其他 Interrupt 中斷,所以一定會當下完成;而 bottom half 則會被排入 softiqr 重新排成,
soft在 OS 中有時是代表不確定何時會被完成
實作面的部分參考 lkmpg 15.2 Detecting button presses,透過 request_irq 註冊 interrupt request,當指定的 I/O 發生 interrupt 時就會呼叫註冊的 funtion
| |
更多的討論可以參考文件,不同的 CPU 與作業系統有不同的考量,考慮到排程 realtime OS 的設計又會有不同
延伸:Linux 的 Asynchronous I/O
現在流行的 network I/O 處理方式是透過 I/O multiplexing,如 Linux 的 epoll,而 asynchrous I/O 看起來十分的迷人,應用程式發出請求後就直接等到作業系統通知,中間完全不用等待,但為什麼目前沒有被大規模採納呢?
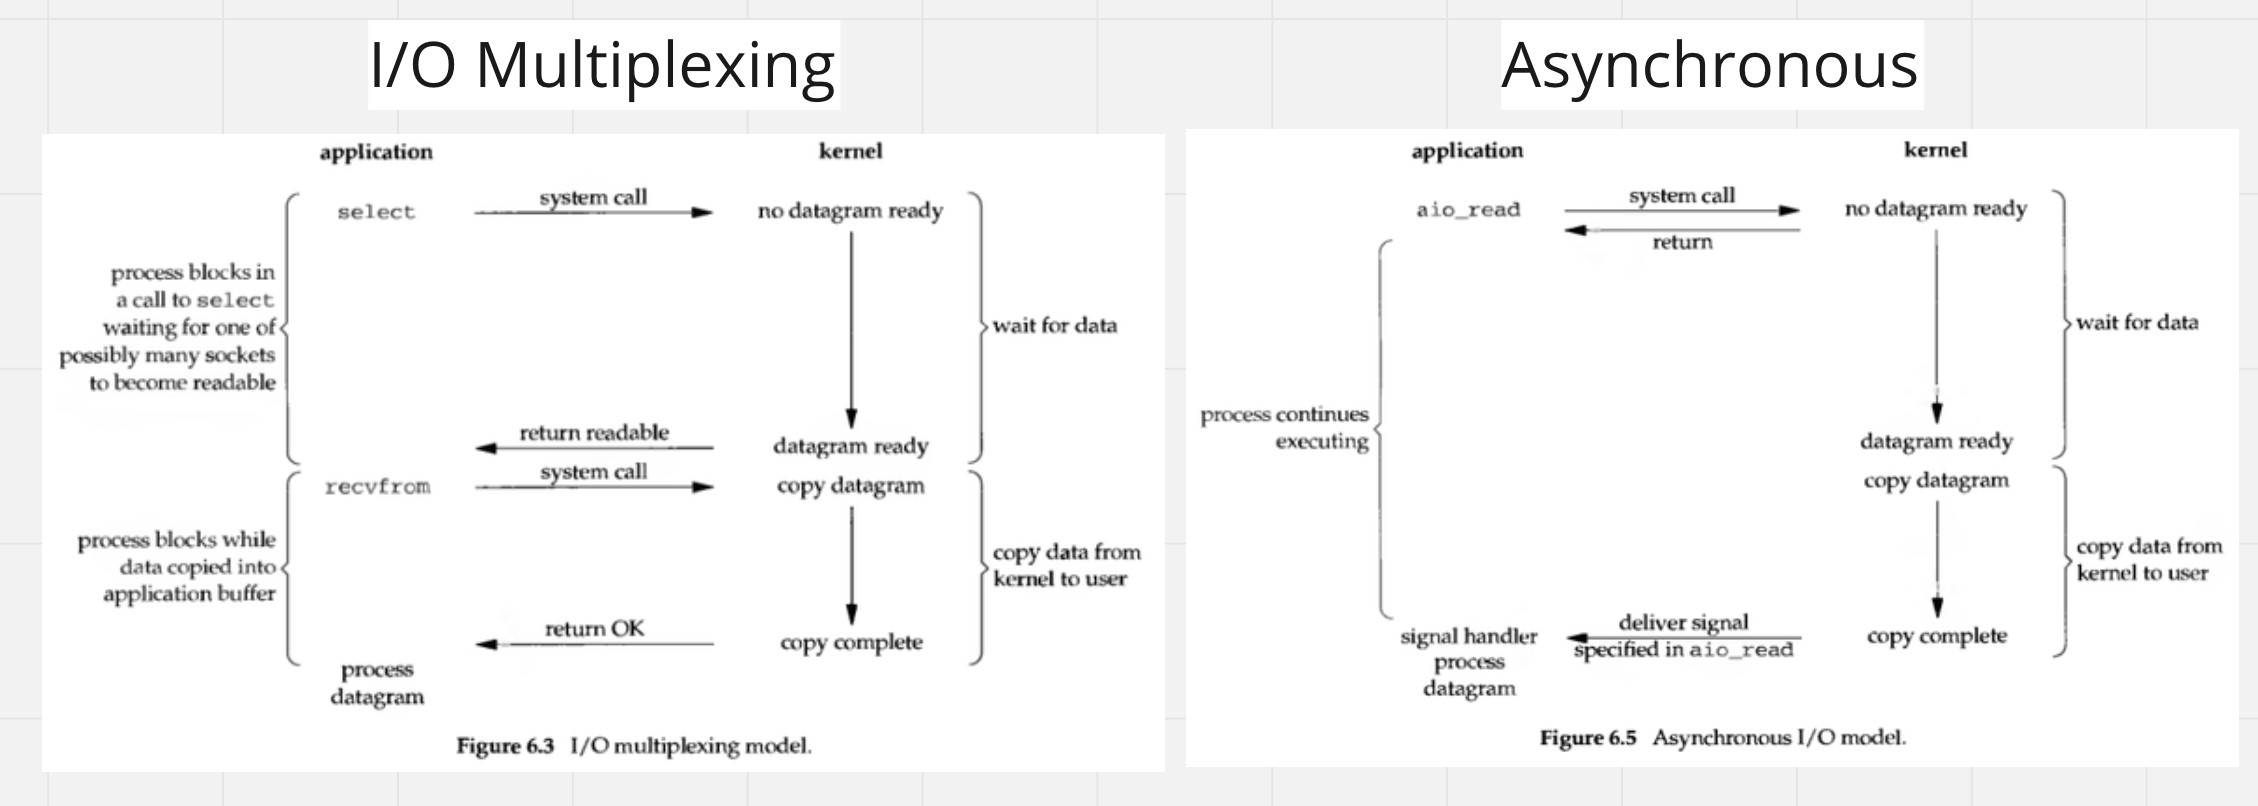
*圖片參考資料 https://medium.com/@clu1022/%E6%B7%BA%E8%AB%87i-o-model-32da09c619e6
參考資料 Efficient IO with io_uring,AIO 在 Linux 2.5 就已經加入了,但持續被詬病例如針對 buffer i/o 還是會變成 synchronous 且 API 難以使用,在 Linux 5.1 後加入了 io_urning新的 AIO API 並持續優化
libuv 有開始討論導入 io_uring 的部分,有人提供 benchmark 在讀取檔案部分可以比原本的 thread pool 設計更快
SO: Is there really no asynchronous block I/O on Linux? 裡面有提供很多的相關連結,資料庫如 PostgreSQL / RocksDB 嘗試用 io_uring 提升硬碟讀寫效能,在 networking 方面也有一些嘗試,在另一篇文章 Epoll vs. io_uring 效能測試與比較看起來效能提升不少,CPU 使用率低且能處理更多的 request,之後有機會再深入研究
總結
突然間不知如何總結,研究的過程比想像中發散,看了很多文件 XD
大抵上從 high level 角度理解了整個 I/O 發生的過程,認識到了「應用程式讀寫 IO 的過程」,中間涉及到 system call / kernel module 的執行,以及 OS context switch 的過程,或許我真正想釐清的是 並非把 I/O 變成 non-blocking / asynchronous 系統效能就會無腦提升,memory 的 copy / interrupt handler 處理等還是會佔用 CPU 時間,可以參考另一篇 cloudflare 的整理,真正想做到效能提升有時還是需要 I/O 裝置的升級
研究的過程還有很多沒解釋清楚的地方,例如 File 的資料如何被 I/O 裝置讀寫,需要在涉獵更多硬體相關的知識,或許該來研究樹莓派了 XD
總之,也算是稍稍釐清困擾自己多年的疑惑,希望也可以分享給對於應用程式與 I/O 裝置互動有疑問的人,我在每一段都盡可能留下參照的 lkmpg 章節,強烈推薦有興趣可以讀完整篇,對於 Linux 作業系統有基本的認知
如果有任何不清楚或寫錯的地方,再麻煩留言指教